In this tutorial, we will learn how to create dummy variables in R. Now, creating dummy/indicator variables can be carried out in many ways. For example, we can write code using the ifelse() function, we can install the R-package fastDummies, and we can work with other packages and functions (e.g. model.matrix). In this post, however, we will use the ifelse() function and the fastDummies package (i.e., dummy_cols() function). First, we will explain why we may need to dummy code some of our variables.

Table of Contents
- Outline
- Dummy Coding
- What You Need to Make Dummy Variables
- How to Create Dummy Variables in R in Two Steps: ifelse() example
- Three Steps to Create Dummy Variables in R with the fastDummies Package
- How to Create Dummy Variables for More than One Column
- Removing the Columns
- How to Make Dummy Variables in R with the step_dummy() Function
- Create a Dummy Variable in R Based on Multiple Conditions
- Other Options for Dummy Coding in R
- Summary and Conclusion
- Additional Resources
- Resources
Outline
In the first section of this post, you will learn when we need to dummy code our categorical variables. This section is followed by a section outlining what you need to have installed to follow this post. For example, this section will show you how to install packages that you can use to create dummy variables in R. Now, this is followed by three answers to frequently asked questions concerning dummy coding, both in general but also in R. Note, the answers will also give you the knowledge to create indicator variables.
Finally, we are going to get into the different methods that we can use for dummy coding in R. First, we will use the ifelse() function, and you will learn how to create dummy variables in two simple steps. Second, we will use the fastDummies package, and you will learn three simple steps for dummy coding. The fastDummies package is also much easier to work with when you, e.g., want to make indicator variables from multiple columns. Therefore, there will be a section covering this and removing columns we no longer need. In the following section, we will also look at how to use the recipes package for creating dummy variables in R. We will also cover dummy coding based on multiple conditions. Before concluding the post, we will also learn about some other available options.
Dummy Coding
In regression analysis, a prerequisite is that all input variables are at the interval scale level, i.e., the distance between all steps on the scale of the variable is the same length. However, it is not possible that all the possible things we want to research can be transformed into measurable scales. For example, different categories and characteristics do not necessarily have an inherent ranking. If we are, for example, interested in the impact of different educational approaches on political attitudes, it is not possible to assume that science education is twice as much as social science education or that a librarian education is half the education in biomedicine. The different types of education are simply different (but some aspects can, after all, be compared, for example, the length).
What if we think that education has an important effect that we want to consider in our data analysis? Well, these are some situations when we need to use dummy variables. Read on to learn how to create dummy variables for categorical variables in R.
What You Need to Make Dummy Variables
In this section, before answering frequently asked questions, you will briefly learn what you need to follow in this post. First, if you plan on dummy coding using base R (e.g., by using the ifelse() function) you do not need to install any packages. However, if you plan on using the fastDummies package or the recipes package, you must install either one (or both if you want to follow every section of this R tutorial). Installing packages can be done using the install.packages() function. Here is how to install the two dummy coding packages:
install.packages(c("fastDummies", "recipes"))Code language: R (r)Of course, if you only want to install one, you can remove the vector (i.e., c()) and leave the package you want. Note recipes is a package that is part of the Tidyverse. This means that we can install this package and get a lot of useful packages by installing Tidyverse. In the next section, we will quickly answer some questions.
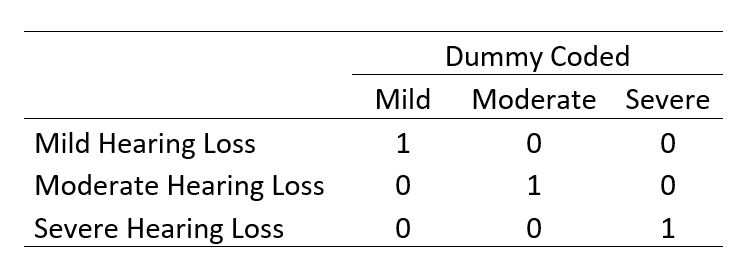
A dummy variable is a variable that indicates whether an observation has a particular characteristic. A dummy variable can only assume the values 0 and 1, where 0 indicates the absence of the property, and 1 indicates the presence of the same. The values 0/1 can be seen as no/yes or off/on. See the table below for some examples of dummy variables.
Creating dummy variables in R can incorporate nominal variables into regression analysis. It is quite easy to understand why we create dummy variables once you understand the regression model.
To create a dummy variable in R, you can use the ifelse() method:df$Male <- ifelse(df$sex == 'male', 1, 0) df$Female <- ifelse(df$sex == 'female', 1, 0)
. This code will create two new columns where, in the column “Male” you will get the number “1” when the subject was a male and “0” when she was a female. For the column “Female”, it will be the opposite (Female = 1, Male =0).
| Variable | Possible Values |
| Smoking | Smoker = 1, Non-smoker = 0 |
| Location | North = 1, South = 0 |
| Answer | Yes = 1, No = 0 |
Note, if you want to, it is possible to rename the levels of a factor in R before making dummy variables. Now, let’s jump directly into a simple example of how to make dummy variables in R. In the next two sections, we will learn dummy coding using R’s ifelse(), and fastDummies’ dummy_cols(). In the final section, we will look at how to use the recipes package for dummy coding.
How to Create Dummy Variables in R in Two Steps: ifelse() example
Here is how to create dummy variables in R using the ifelse() function in two simple steps:
1) Import Data
In the first step, import the data (e.g., from a CSV file):
dataf <- read.csv('https://vincentarelbundock.github.io/Rdatasets/csv/carData/Salaries.csv')Code language: R (r)In the code above, we must ensure the character string points to where our data is stored (e.g., our .csv file). For example, when loading a dataset from our hard drive, we must ensure we add the path to this file. In the next step, we will create two dummy variables in two lines of code.
2) Create the Dummy Variables with the ifelse() Function
Next, start creating the dummy variables in R using the ifelse() function:
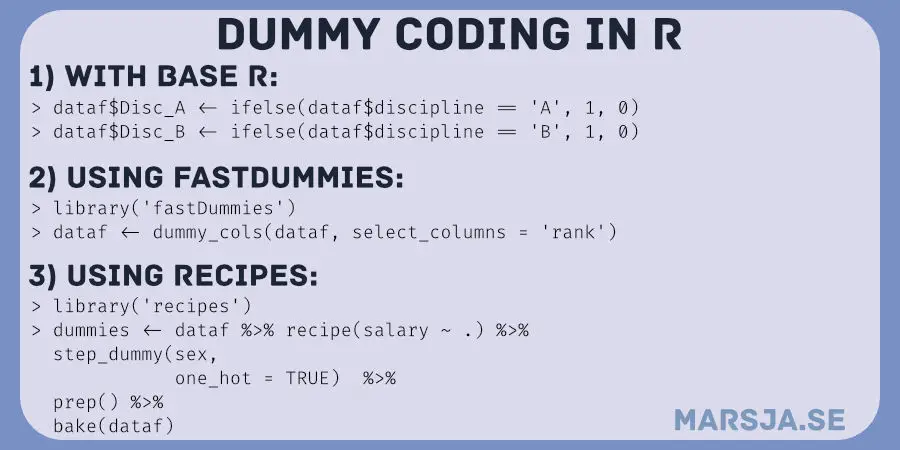
dataf$Disc_A <- ifelse(dataf$discipline == 'A', 1, 0)
dataf$Disc_B <- ifelse(dataf$discipline == 'B', 1, 0)Code language: QML (qml)
In this simple example above, we created the dummy variables using the ifelse() function. First, we read data from a CSV file (from the web). Second, we created two new columns. In the first column we created, we assigned a numerical value (i.e., 1) if the cell value in column discipline was ‘A’. If not, we assign the value ‘0’. Of course, we did the same when we created the second column. Here are the first five rows of the dataframe:

Now, data can be imported into R from other formats. If the data, we want to dummy code in R, is stored in Excel files, check out the post about how to read xlsx files in R. As we sometimes work with datasets with many variables, using the ifelse() approach may not be the best way. For instance, creating dummy variables this way will definitely make the R code harder to read. In the next section, we will go on and have a look at another approach for dummy coding categorical variables.
Three Steps to Create Dummy Variables in R with the fastDummies Package
In this section, we will use the fastDummies package to make dummy variables. There are three simple steps for creating dummy variables with the dummy_cols function.
Here is how to make dummy variables in R using the fastDummies package:
1) Install the fastDummies Package
First, we need to install the r-package. Installing r-packages can be done with the install.packages() function. So start up RStudio and type this in the console:
# Install fastDummies:
install.packages('fastDummies')Code language: R (r)
2) Load the fastDummies Package:
Next, we are going to use the library() function to load the fastDummies package into R:
# Import fastDummies
library('fastDummies')Code language: R (r)
Now that we have installed and loaded the fastDummies package, we will continue, in the next section, with dummy coding our variables.
3) Make Dummy Variables in R
Finally, we can use the dummy_cols() function to make the dummy variables. Here is how to make indicator variables in R using the dummy_cols() function:
# Create dummy variables:
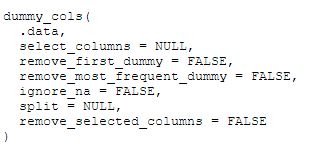
dataf <- dummy_cols(dataf, select_columns = 'rank')Code language: R (r)
Now, the neat thing about using dummy_cols() is that we only get two line of codes. Furthermore, if we want to create dummy variables from more than one column, we’ll save even more lines of code (see next subsection). Now that you are done creating dummy variables, you might want to extract time from datetime.
How to Create Dummy Variables for More than One Column
In the previous section, we used the dummy_cols() method to make dummy variables from one column. It is, of course, possible to dummy code many columns using the ifelse() function and the fastDummies package. However, having many categories in our variables may require many lines of code using the ifelse() function. Thus, in this section, we will add one more column to the select_columns argument of the dummy_cols function.
# Make dummy variables of two columns:
dataf <- dummy_cols(dataf, select_columns = c('rank', 'discipline'))Code language: PHP (php)
As evident from the code example above, the select_columns argument can also take a vector of column names. Of course, this means we can add as many as we need here. The above code will generate five new columns containing the dummy coded variables. Note you can use R to conditionally add a column to the dataframe based on other columns if you need to.
Removing the Columns
In this section, we will use one more of the arguments of the dummy_cols() function: remove_selected_columns. This may be very useful if we, for instance, are going to make dummy variables of multiple variables and do not need them for the data analysis later.
dataf.2 <- dummy_cols(dataf, select_columns = c('rank', 'discipline'),
           remove_selected_columns = TRUE)Code language: R (r)
Note if we do not use the select_columns argument, dummy_cols will create dummy variables of all columns with categorical data. This is especially useful if we want to automatically create dummy variables for all categorical predictors in the R dataframe. See the documentation for more information about the dummy_cols function. Finally, using the fastDummies package, we can create dummy variables as rows with the dummy_rows function.
It is, of course, possible to drop variables after we have done the dummy coding in R. For example, see the post about how to remove a column in R with dplyr for more about deleting columns from the dataframe. In some cases, you also need to delete duplicate rows. Now that you have created dummy variables, you can also go on and extract year from date.
How to Make Dummy Variables in R with the step_dummy() Function
Here is a code example you can use to make dummy variables using the step_dummy() function from the recipes package:
library('recipes')
# Making dummy variables
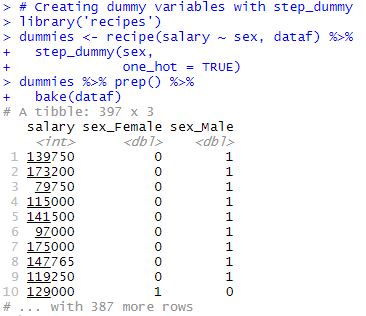
dummies <- dataf %>% recipe(salary ~ .) %>%
step_dummy(sex,
one_hot = TRUE) %>%
prep() %>%
bake(dataf)Code language: PHP (php)Not to get into the details of the code chunk above, but we start by loading the recipes package. Second, we create the variable dummies. On the right of the “arrow” we take our dataframe and create a recipe for preprocessing our data (i.e., this is what this function is for). In this function, we start by setting our dependent variable (i.e., salary), and then, after the tilde, we can add our predictor variables. In our case, we want to select all other variables and use the dot. Now, in the next part, we use step_dummy(), where we make the dummy variables. The first parameter is the categorical variable we want to dummy code. The second parameter is set to TRUE so that we get a column for male and a column for female. If this is not set to TRUE, we only get one column. Finally, we use the prep() so that we later can apply this to the dataset we used (by using bake)). Here are the first ten rows of the new dataframe with indicator variables:
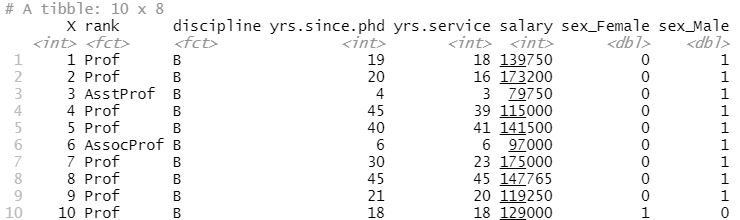
Notice how the column sex was automatically removed from the dataframe. That is, in the dataframe we now have, containing the dummy coded columns, we no longer have the original categorical column. Remember to check the regression analysis assumptions using, e.g., a test for normality in R and by making a residual plot in R with ggplot2.
Note, if you are planning on (also) doing an Analysis of Variance, you can check the assumption of equal variances with the Brown-Forsythe Test in R.
Create a Dummy Variable in R Based on Multiple Conditions
Here is how to make a dummy variable based on a condition:
# Create a dummy variable "is_junior" based on years service and rank
dataf$is_junior <- ifelse(dataf$yrs.since.phd <= 5 | dataf$rank == "AsstProf", 1, 0)Code language: R (r)
In the code block above, we introduce the addition of the logical OR (|) operator to create a dummy variable named “is_junior” based on multiple conditions. If an individual’s yrs.since.phd is less than or equal to 5 or their rank is AsstProf, the corresponding entry in is_junior is set to 1; otherwise, it is set to 0
Other Options for Dummy Coding in R
Before summarizing this R tutorial, it may be worth mentioning that there are other options to recode categorical data to dummy variables. For instance, we could have used the model.matrix function, and the dummies package. However, it is worth pointing out that the dummies package hasn’t been updated for a while.
Finally, it may be worth mentioning that the recipes package is part of the tidyverse package. Thus installing tidyverse, you can do more than create dummy variables. For instance, using the tibble package, you can add empty column to the R dataframe or calculate/add new variables/columns to a dataframe in R.
Summary and Conclusion
In this post, we have 1) worked with R’s ifelse() function and 2) the fastDummies package to recode categorical variables to dummy variables in R. We learned that it was an easy task with R. Especially, when we install and use a package such as fastDummies and have a lot of variables to dummy code (or many levels of the categorical variable). The next step in the data analysis pipeline (may) now be to analyze the data (e.g., regression or random forest modeling).
Additional Resources
Now, there are other valuable resources to learn more about dummy variables (or indicator variables). In this section, you will find some articles and journal papers that you might find useful:
- Categorical Variables in Regression Analysis: A Comparison of Dummy and Effect Coding
- No More: Effect Coding as an Alternative to Dummy Coding With Implications for Higher Education Researchers
- Random Forests, Decision Trees, and Categorical Predictors:The “Absent Levels” Problem
Resources
Here are some tutorials on this blog that you may find helpful:
- Binning in R: Create Bins of Continuous Variables
- How to Create a Sankey Plot in R: 4 Methods
- Z Test in R: A Tutorial on One Sample & Two Sample Z Tests
- How to Create a Word Cloud in R
- Sum Across Columns in R – dplyr & base
- How to Calculate Z Score in R
- Countif function in R with Base and dplyr
- How to Standardize Data in R

Well think you, Sir! This was really a nice tutorial. I was struggling carrying out my data analysis in R and I realized that I needed to create dummy variables. Now, that I know how to do this, I can continue with my project. I think, that, you should add more information about how to use the recipe and step_dummy functions. Explain that part in a bit more detail so that we can use it for recoding the categorical variables (i.e., dummy code them).
Hi Dawn,
Thank you for your kind comments. I’ll look into adding what you suggest! Have a nice day,
Best,
Erik
Thank you! very helpful
Thanks Yasmine! Glad it helped!
Wonderful
Thanks Mohamed. Glad you liked the post.
excellent explanation!
thanks for your contribution
Thank you, Javier. Glad you appreciated the tutorial.
I was looking for a clear and straightforward illustration of how to create a dummy variable in R, and this post was what I needed! The step-by-step guide made the process so easy to understand, and I’m grateful for your examples. Now I have a solid grasp of how to create dummy variables for my data analysis projects effectively. Your explanation of the concepts and the code snippets you shared were constructive.
Thank you for taking the time to put together such a helpful and informative post. Your writing and pedagogical style made the content very accessible, even for someone like me who is still learning R programming. I’ll be bookmarking this post for future reference, as it’s an awesome resource for anyone looking to work with categorical data in R. Keep up the great work, and I’m looking forward to exploring more of your content in the future!
Thank you for your kind commments! Glad you enjoyed the post and learned something from it.