In this post, you will learn how to select columns in R. Selecting specific columns is crucial when working with data in Psychology and data science. Whether you are analyzing survey data to examine relationships between variables or performing data-wrangling tasks, knowing how to extract relevant columns may be essential for your analysis.
Imagine you have a dataset containing variables such as age, gender, and Psychological test scores. Select only the “age” and “test scores” columns to focus on the relationship between age and test performance. By doing so, you can easily perform statistical analyses to explore age-related patterns in test performance.
Similarly, in data science, you may encounter datasets with numerous columns (big data), each representing different features or measurements. Suppose you are working on a classification task to predict customer churn based on various customer attributes. Selecting the relevant columns, such as customer demographics, purchase history, and service usage, enables you to build accurate predictive models tailored to specific variables.
In R, selecting columns can be accomplished using various functions and techniques. You will learn about functions like subset(), select(), and indexing methods such as using column names or numeric indices. With these tools, you can efficiently extract and manipulate the data, focusing on the specific columns of interest.
By mastering the art of column selection in R, you will enhance your data analysis skills and gain the ability to extract meaningful insights from your datasets, whether in psychology or data science domains.
Table of Contents
- Outline
- Prerequisites
- Example Data
- How to Select Certain Columns using Base R
- How to Select Columns in R with dplyr
- Example 4: Subsetting Columns by Index Using the select() Function
- Example 5: Getting Columns by Name with select()
- Example 6: Selecting All Numeric Columns in R
- Example 7: Select Columns Starting with a Certain Letter
- Example 8: Select Columns Ending with a Specific Letter
- Example 9: Select Columns Starting with a Certain Word
- Example 10: Select Columns Containing a Certain String
- Example 11: Select Columns Containing a Certain String
- Conclusion: Select Columns in R
Outline
The outline of this post is structured to guide you through selecting columns in R. We will cover both the base R approach and using the dplyr package. Before diving into the examples, we will briefly discuss the prerequisites and provide an example dataset to work with. In the first section, we will explore how to select columns using base R. We will demonstrate three examples: selecting columns by index, selecting specific columns by their names, and using the %in% operator. Next, we will move on to selecting columns in R with dplyr. We will showcase various scenarios, including subsetting columns by index using the select() function, getting columns by name with select(), selecting all numeric columns, and filtering columns based on patterns such as starting or ending with specific letters or containing certain strings. By the end of this post, you will have a solid understanding of different techniques for selecting columns in R, empowering you to work efficiently with your data.
![select columns in R with [] and dplyr](https://www.marsja.se/wp-content/uploads/2020/11/how_to_get_certain_columns_in_R_examples.jpg)
Note, the select_if() function is also great if you, for example, want to take the absolute value in R dataframe and only select the numerical columns.
To select a column in R, you can use brackets, e.g., YourDataFrame['Column'] will take the column named “Column”. Furthermore, we can also use dplyr and the select() function to get columns by name or index. For instance, select(YourDataFrame, c('A', 'B') it will take the columns named “A” and “B” from the dataframe.
If you want to use dplyr to select a column in R, you can use the select() function. For instance, select(Data, ‘Column_to_Get’) it will get the column “Column_to_Get” from the dataframe “Data”.
In the next section, we will learn about the prerequisites of this post and how to install R packages such as dplyr (or Tidyverse).
Prerequisites
To follow this post, you need a working installation of R. Furthermore, we will use the read the example data from an Excel file using the readxl package. Moreover, if you want to use dplyr’s select() and the different helper functions (e.g., startsWith(), endsWith()) you also need to install dplyr. It may be worth pointing out that just by using the “-“-character, you can use select() (from dplyr) to drop columns in R.
It may be worth pointing out that readxl and dplyr are part of the tidyverse. Tidyverse comes with several great packages that are packed with great functions. Besides selecting or removing columns with dplyr (part of Tidyverse) you can extract year from date in R using the lubridate package, create scatter plots with ggplot2, and calculate descriptive statistics. That said, you can install one of these r-packages, depending on what you need, using the install.packages() function. For example, installing dplyr is done by running this in R: install.packages(c('dplyr', 'readxl')).
Example Data
Before we continue and practice selecting columns in R, we will read data from a .xlsx file.
library(readxl)

dataf <- read_excel("add_column.xlsx")
head(dataf)Code language: R (r)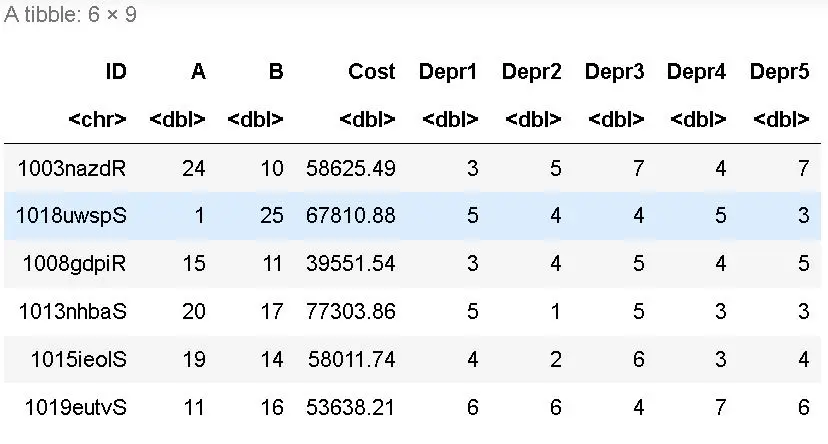
This example dataset is one that we used in the tutorial, in which we added a column based on other columns. We can see that it contains nine different columns. If we want to, we can check the structure of the dataframe to see what kind of data we have.
str(dataf)Code language: R (r)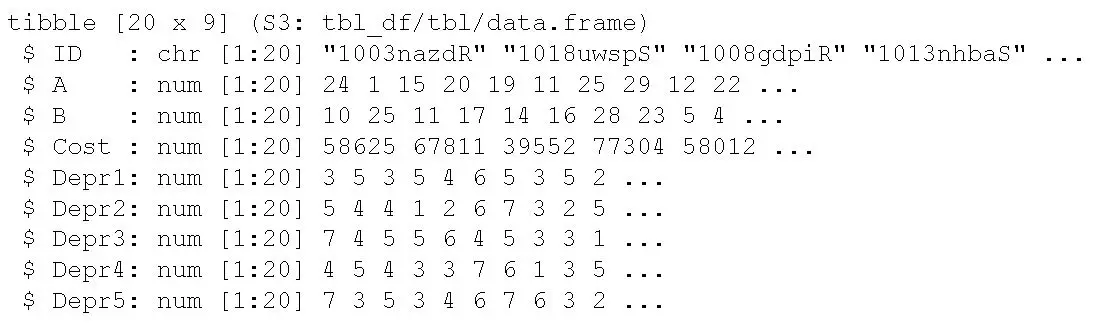
Now, we see that there are 20 rows, as well, and that all but one column is numeric. In a more recent post, you can learn how to rename columns in R with dplyr. In the next section, we will learn how to select certain columns from this dataframe using base R.
How to Select Certain Columns using Base R
In this section, we will practice selecting columns using base R. First, we will use the column indexes, and second, we will use the column names.
Example 1: Selecting Columns by Index
Here is an example of how to select columns by their indexes in R:
dataf[, c(1, 2, 3)]Code language: R (r)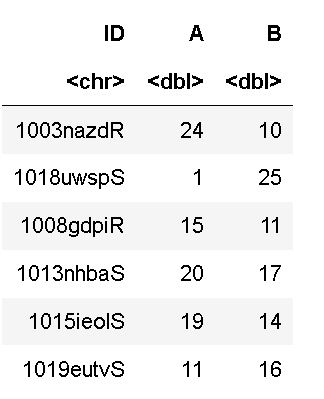
As you can see, we selected the first three columns using their indexes (1, 2, 3). Notice how we also used the “,” within the brackets. This is done to get the columns rather than subsetting rows (i.e., by placing the “,” after the vector with indexes). Before moving on to the following example, it may be worth knowing that the vector can contain a sequence. For instance, we can generate a sequence of numbers using “:”. For example, replacing c(1, 2, 3) with c(1:3) would give us the same output as above. Naturally, we can also select, e.g., the third, fifth, and sixth columns if we want to. In the next example, we will subset certain columns by their name. Note sequences of numbers can also be generated in R with the seq() function.
Example 2: Selecting Specific Columns by their Names
Here is how we can select columns in R by name:
dataf[, c('A', 'B', 'Cost')]Code language: R (r)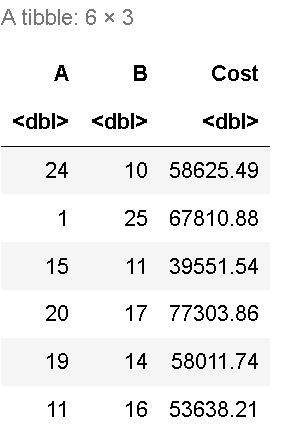
In the code chunk above, we did the same as in the first example. Notice how we removed the numbers and added the column names. In the vector, we now used the names of the column we wanted to select. In the next example, we will learn a neat little trick using the %in% operator when selecting columns by name.
Example 3: Using the %in%
Here is how we can make use of the %in% operator to get columns by name from the R dataframe:
head(dataf[, (colnames(dataf) %in% c('Depr1', 'Depr2',
                                     'Depr4', 'Depr7'))])Code language: R (r)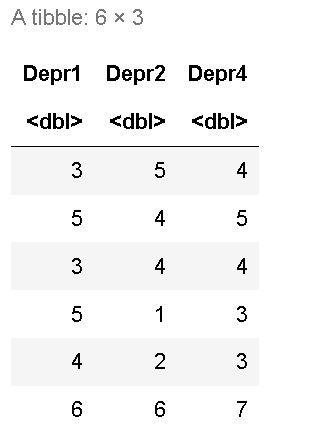
In the code chunk above, we used the great %in% operator. Notice something diffrent in the character vector? There’s a column that doesn’t exist in the example data. The cool thing, here, is that even though if we do this when using the %in% operator, we will get the columns that actually exists in the dataframe selected. In the next section, we are going to have a look at a couple of examples using dplyr’s select() and some of the great helper functions.
How to Select Columns in R with dplyr
This section will start with the primary examples of selecting columns (e.g., by name and index). However, the focus will be on using the helper functions together with select(), and the select_if() function.
Example 4: Subsetting Columns by Index Using the select() Function
Here is how we can get columns by index using the select() function:
library(dplyr)

dataf %>%
  select(c(2, 5, 6))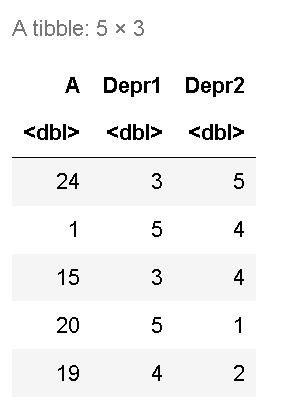
Notice how we used another great operator: %>%. This is the pipe operator, and following the pipe operator, we used the select() function. Again, when selecting columns with base R, we added a vector with the wanted indexes. In the next example, we will do the same but select by column names.
Example 5: Getting Columns by Name with select()
Here’s how we use select() to get the columns, we want by name:
library(dplyr)

dataf %>%
  select(c('A', 'Cost', 'Depr1'))Code language: R (r)
In the code chunk above, we just added the names of the columns in the vector. Simple! In the next example, we are going to have a look at how to use select_if() to select columns containing data of a specific data type.
Example 6: Selecting All Numeric Columns in R
Here is how to select all the numeric columns in an R dataframe:
dataf %>%
  select_if(is.numeric)Code language: CSS (css)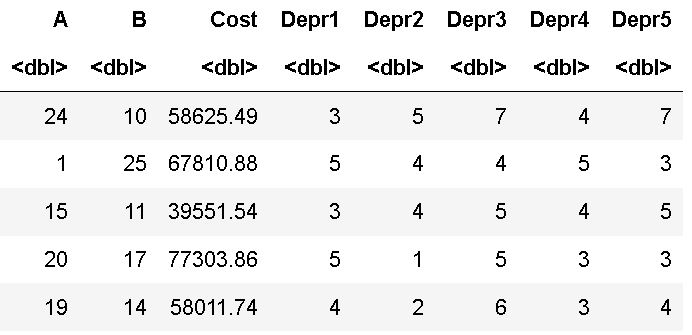
Remember, all columns except for one are of numeric type. This means we will get 8 out of 9 columns running the above code. If we, on the other hand, added the is.character function we would only select the first column. In the next section, we will learn how to get columns starting with a certain letter.
Example 7: Select Columns Starting with a Certain Letter
Here’s how we use the starts_with() helper function and select() to get all columns starting with the letter “D”:
dataf %>%
    select(starts_with('D'))Code language: R (r)
Selecting columns with names beginning with a specific letter was pretty easy. In the starts_with() helper function, we just added the letter.
Example 8: Select Columns Ending with a Specific Letter
Here’s how we use the ends_with() helper function and select() to get all columns ending with the letter “D”:
dataf %>%
   select(ends_with('D'))Code language: R (r)
Note that in the example dataset, only one column ends with the letter “D”. In fact, all column names end with unique characters. Here, it would not make sense to select columns using this method. It is worth noting here that we can use a word when working with both the starts_with() and ends_with() helper functions. Let’s have a look!
Example 9: Select Columns Starting with a Certain Word
Here is how we can select certain columns starting with a specific word:
dataf %>%
    select(starts_with('Depr'))Code language: R (r)
Of course, “Depr” is not a word; yes, we get the same columns as in example 7. However, you get the idea and should understand how to use this in your application. One example of this making sense is when multiple columns begin with the same letter, but some begin with the same word. In the final example, we will select certain column names that contain a string (or a word).
Example 10: Select Columns Containing a Certain String
Here is how we can select certain columns starting with a string:
dataf %>%
    select(starts_with('Depr'))Code language: R (r)
Of course, “Depr” is not a word and yes, we get the same columns as in example 7. However, you get the idea and should understand how to use this in your own application. One example of this making sense is when multiple columns begin with the same letter, but some begin with the same word. Before going to the next section, it may be worth mentioning another great feature of the dplyr package. You can use dplyr to rename factor levels in R. In the final example, we will select certain column names that contain a string (or a word).
Example 11: Select Columns Containing a Certain String
Here is how we can select certain columns starting with a string:
dataf %>%
    select(contains('pr'))Code language: R (r)
Again, this particular example doesn’t make sense on the example dataset. There is a final helper function that is worth mentioning: matches(). This function can check whether column names contain a pattern (regular expression), such as digits. Now that you have selected the columns you need, you can continue manipulating and preparing your data for data analysis. For example, you can now go ahead and create dummy variables in R or add a new column.

Conclusion: Select Columns in R
In this post, we have learned various techniques to select columns in R, using both base R and the dplyr package. We explored examples of selecting columns by index, by name, and with specific patterns or criteria. By understanding these methods, you can efficiently manipulate and analyze your data according to your needs.
Selecting columns in R is a fundamental skill for data scientists and analysts. It enables us to extract relevant information, focus on specific variables of interest, and perform various data operations more effectively.
I encourage you to apply the knowledge gained in this post to your own projects and analyses. Experiment with different approaches and see how they can enhance your data exploration and analysis workflows. Remember to share your findings and experiences on social media, inviting others to join the discussion and benefit from your insights.
Whether you are writing a report, a blog post, or sharing your data analysis journey, do not forget to link to this blog post. By doing so, you can help others discover these valuable techniques for selecting columns in R, fostering a collaborative and knowledge-sharing community.
Thank you for reading, and we hope you found this post informative and helpful. Stay tuned for more exciting topics and tutorials in our future posts. Happy coding!