Introduction
Running R in Jupyter Notebook allows us to use notebooks’ power and simplicity for data analysis and research tasks. This post will cover the benefits and capabilities of using R in a Jupyter Notebook.
Firstly, let us briefly introduce the concept of a notebook. A notebook is an interactive document that combines code, visualizations, and explanatory text. It provides a convenient way to organize and present your analysis, making sharing and collaborating easier. Notebooks have gained popularity in data science and research due to their flexibility and reproducibility.
Now, let us learn about using notebooks in data science and research. Notebooks provide an integrated environment where you can write, execute, and visualize your R code. This allows for a seamless workflow, as you can analyze and manipulate data, create visualizations, and document your findings all in one place. Notebooks also support using markdown, which enables you to include explanatory text, equations, and images alongside your code.
By running R in Jupyter Notebook, you can take advantage of its extensive statistical analysis, data visualization, and machine learning capabilities while benefiting from its interactive and collaborative features. The following sections will explore how to set up and use R in Jupyter Notebook and its advantages for data analysis projects. So, let us get started and learn how to use R in Jupyter Notebook.
Table of Contents
- Introduction
- Outline
- Jupyter Notebook: A Brief Overview
- Running R in Jupyter Notebook
- Why Run R in Jupyter Notebook
- Method 1: Add R in Jupyter Notebook in RStudio
- Method 2: Adding R Support to Jupyter Notebook with Anaconda
- Conclusion
- Resources
Outline
In this comprehensive post, we will examine different aspects of integrating R into Jupyter Notebooks. We will begin with a brief overview of Jupyter Notebooks to set the stage. Next, we will get into the heart of the matter, exploring the importance and benefits of running R within this versatile environment.
We will then present two methods for adding R support to your Jupyter Notebook, catering to different preferences and requirements. The first method, involving RStudio, may be the preferred choice for those seeking the latest R version. On the other hand, Method 2, which integrates R support with Anaconda, provides an alternative approach for seamless integration.
As we conclude, we will summarize the advantages and steps required to get started. We will ensure you are well-equipped to harness the potential of running R in Jupyter Notebook, enhancing your data science endeavors. This post is your guide to unlocking this dynamic combination’s capabilities and versatility.
Jupyter Notebook: A Brief Overview
Jupyter Notebook is an open-source web application that allows you to create and share documents that contain live code, visualizations, and explanatory text. It provides an interactive computing environment that supports multiple programming languages, including R.
The significance of the Jupyter Notebook lies in its ability to combine code, visualizations, and text in a single document. This makes it an ideal data analysis, research, and collaboration tool. With Jupyter Notebook, you can write and execute code, view the output, and document your analysis all in one place.
One of the key features of Jupyter Notebook is its support for markdown, a lightweight markup language. Markdown lets you include formatted text, equations, images, and interactive elements in your notebooks. This makes it easy to create reports, tutorials, and presentations that are both informative and visually appealing.
Another advantage of Jupyter Notebook is its ability to run code modularly and interactively. You can execute code cells individually, allowing easy experimentation and debugging. Additionally, Jupyter Notebook provides a rich set of tools and libraries for data visualization, making it a powerful tool for exploratory data analysis.
The following section will explore how to run R in Jupyter Notebook and its benefits for your data analysis projects. So, let us start this blog post and discover the power and simplicity of running R in Jupyter Notebook.
Running R in Jupyter Notebook
Running R in Jupyter Notebook offers a range of benefits for data analysis projects. By integrating R into the Jupyter environment, you can take advantage of the power and simplicity of notebooks to enhance your data analysis workflow.
To add R support to your Jupyter Notebook, you can use the IRkernel package. IRkernel allows you to create R notebooks and execute R code within Jupyter. Once installed, you can create a new R notebook or change the kernel of an existing notebook to R. This enables you to seamlessly switch between different programming languages within the same Jupyter environment.
The next section will get deeper into the benefits of running R in Jupyter Notebook, highlighting its versatility and data science capabilities. So, let us continue our exploration and discover the power of combining R and Jupyter Notebook for your data analysis projects.
Why Run R in Jupyter Notebook
Running R in Jupyter Notebook offers a range of benefits for data analysis projects. By integrating R into the Jupyter environment, you can make use of the power and simplicity of notebooks to enhance your data analysis workflow.
One of the main reasons to use R in Jupyter Notebook is the seamless integration of code, visualizations, and explanatory text. With R, you can write and execute code to perform complex data manipulations, statistical analyses, and generate visualizations. Combining this code with markdown cells lets you provide detailed explanations, insights, and interpretations of your analysis, making your notebooks more informative and accessible.
Another advantage of running R in Jupyter Notebook is leveraging the vast ecosystem of R packages and libraries. R has a rich collection of packages for data manipulation, statistical modeling, machine learning, and visualization. By using R in Jupyter Notebook, you can easily access and utilize these packages, expanding your analytical capabilities and speeding up your workflow.
Moreover, Jupyter Notebook provides an interactive and collaborative environment for data analysis. You can share your notebooks with colleagues or collaborators, allowing them to reproduce your analysis, modify the code, and contribute to the project. This collaborative aspect enhances the reproducibility and transparency of your work.
In the next section, we will dig deeper into how to add R support to Jupyter Notebook, providing a step-by-step guide on integrating R and making the setup seamless. So, let us continue our exploration and unlock the full potential of combining R and Jupyter Notebook for your data analysis projects.
Method 1: Add R in Jupyter Notebook in RStudio
To use R in a Jupyter Notebook, follow the following steps.
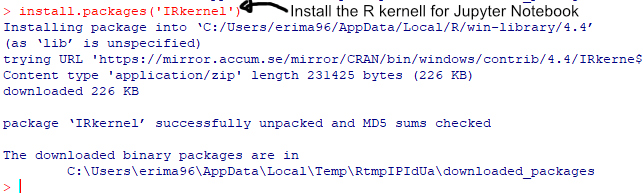
1. Install IRkernel. Open up the R Gui or Terminal and type install.packages('IRkernel') in the console.
2. Make the kernel available in Jupyter. Next, make the R kernel available for your Jupyter Notebooks. This is done by executing IRkernel::installspec() in the console. Remember, you need to have already Jupyter Notebook installed.

Note that you might have to change the working directory using the setwd() function. In the example above, we set it to an Anaconda environment called “PyPosts”.
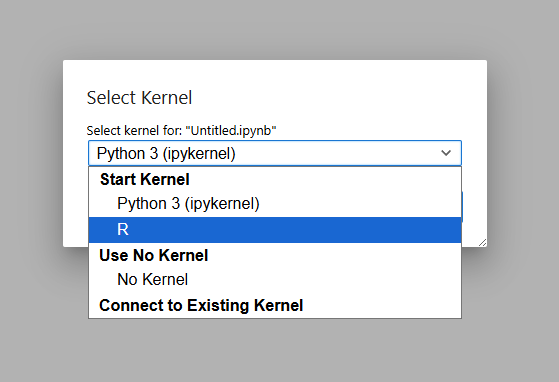
3. Choose the R kernel in Jupyter. When starting a new Jupyter Notebook, make sure you choose R under Start Other Kernel:
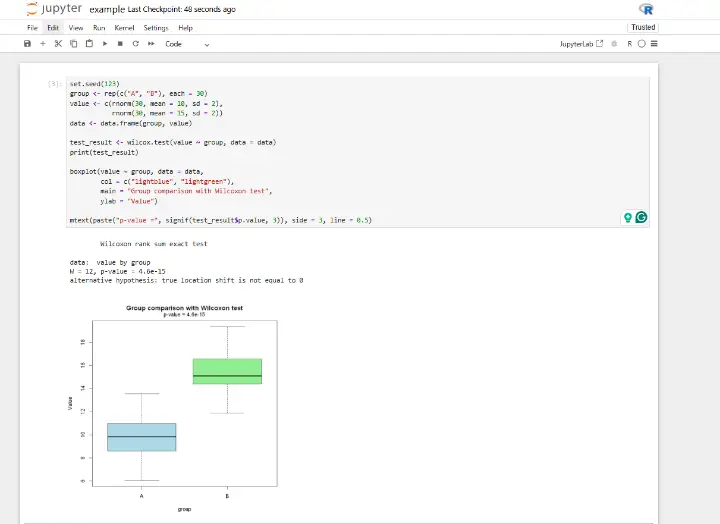
4. Write and execute R code in your Jupyter Notebook. Finally, we can run R scripts within Jupyter Notebook. Here is an example:
The next section will cover an alternative method that enables us to run R in Jupyter Notebook.
Method 2: Adding R Support to Jupyter Notebook with Anaconda
To integrate R into Jupyter Notebook, follow this step-by-step guide for a seamless setup.
1. Install Anaconda, a popular data science platform including Jupyter Notebook. Anaconda provides a convenient way to manage your Python and R environments.
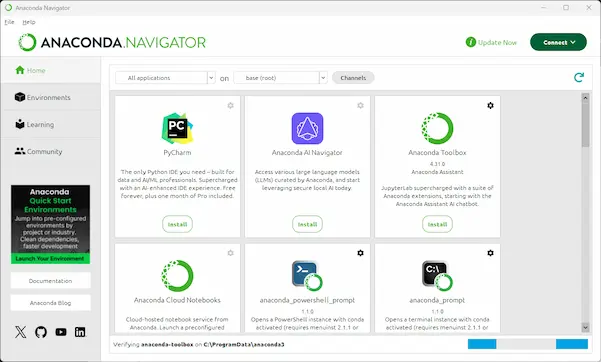
2. Open Anaconda Navigator and create a new environment specifically for R. This will ensure that your R packages and dependencies are isolated from your Python environment.
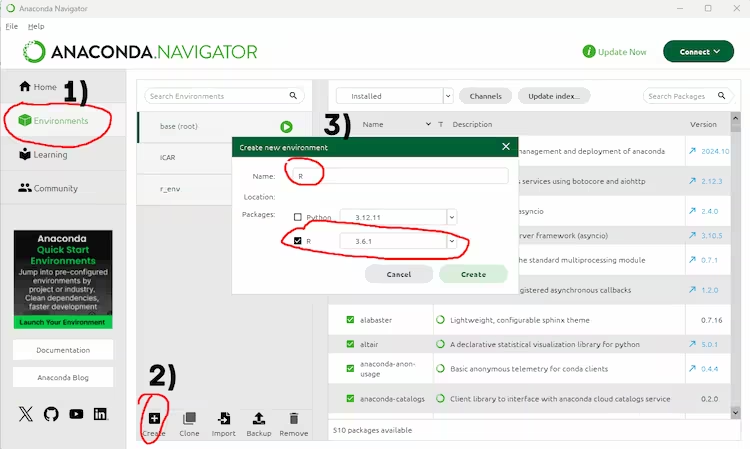
Note that this way, you will not get the latest version of R in your Jupyter Notebook.
3. The R Essentials package will be installed in the new environment. This package includes the components to run R in Jupyter Notebook, such as the IRkernel.
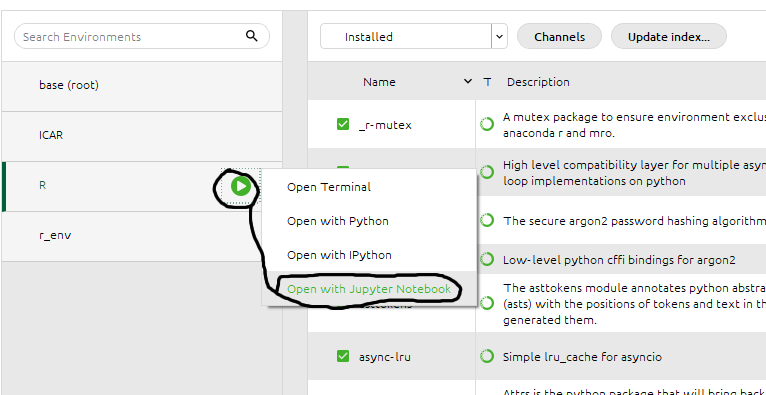
4. Create a new R notebook and execute some basic R code to ensure everything works correctly. You can also try importing and using R packages to verify they are accessible within the Jupyter Notebook.
By following these steps, you can easily add R support to Jupyter Notebook and take advantage of the power and simplicity of notebooks for your R-based data analysis projects. With R in Jupyter Notebook, you can seamlessly integrate code, visualizations, and explanatory text, use the large ecosystem of R packages, and collaborate with others to enhance the reproducibility and transparency of your work.
Conclusion
In conclusion, running R in Jupyter Notebook offers a powerful and simple way to enhance data analysis projects. By integrating R into Jupyter Notebook, you can seamlessly combine code, visualizations, and explanatory text, making your analysis more interactive and accessible.
The advantages of using R in Jupyter Notebook are numerous. First, Jupyter Notebook provides a user-friendly interface that allows you to organize and document your code and analysis in a single, shareable document. This makes it easier to collaborate with others and enhance the reproducibility and transparency of your work.
Second, Jupyter Notebook supports multiple programming languages, including R and Python. As previously mentioned, this means you can use the enormous ecosystem of R packages and libraries and Python’s powerful data manipulation and visualization capabilities within the same notebook.
To start running R in Jupyter Notebook, follow the step-by-step guide outlined in the previous section. Install Anaconda, create a new environment for R, install the R Essentials package, and launch Jupyter Notebook. Test your setup by executing some basic R code and importing R packages.
I encourage you to comment on this post and share it with others who may find it helpful. Running R in Jupyter Notebook opens up a world of possibilities for your data analysis projects, and we hope this post has provided you with the information you need to get started.
Resources
Here are some other great R tutorials on this blog:
- How to Transpose a Dataframe or Matrix in R with the t() Function
- Correlation in R: Coefficients, Visualizations, & Matrix Analysis
- How to use %in% in R: 8 Example Uses of the Operator
- How to Rename Column (or Columns) in R with dplyr
- Check Variable Type in R: How to Use typeof() & str()
- Wide to Long in R using the pivot_longer & melt functions
