In this short tutorial, you will learn how to convert a list to a dataframe in R. To know how to convert lists to dataframes may be useful when you, for example, get your data from a source and they end up in a list of, e.g., vectors. Here is an example code template that you can use to change a list of vectors to a dataframe in R:
# Converting list to dataframe in R
DF <- as.data.frame(YourList)Code language: R (r)
In the next section, you will get an overview of the outline of this post.
Table of Contents
- Outline
- Requirements
- Example Data
- Example 1: Convert List to Dataframe in R
- Example 2: Convert a List to Dataframe in R and Change the Column Names
- Example 3: Converting a List to Dataframe in R using the do.call Function
- Example 4: Convert List to Dataframe in R using dplyr
- Conclusion
Outline
The outline of this post is as follows. First, this tutorial will give you some information on what you need to follow. First, you will get to create example data to use in the rest of the post. Third, we will look at the first example of converting a list to a dataframe in R. Fourth; you will learn how to convert a list to a dataframe by a second example. Now, we will also look at how we can use the do.call function. This can be done to make the rows columns. It may be worth pointing out that this can also be done using the t function. See the post “How to Transpose a Dataframe or Matrix in R with the t() Function” for more information. In the last example, you will learn how to use Tidyverse to change a list to a dataframe.
Requirements
To follow this post and its examples, you will need 1) a working R installation and 2) the dplyr package, which is part of the Tidyverse package. On the other hand, if you only want to know how to create a dataframe from a list, you can stick with base R. However, it is worth pointing out that dplyr can add a column to the dataframe in R, remove duplicates, and count the number of occurrences in a column.
We will create sample data using base R functions in the next section.
Example Data
Here is how we can create a list containing a couple of vectors:
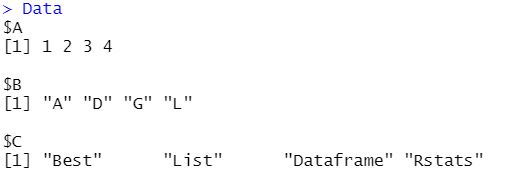
Data <- list(A = seq(1,4),
             B = c("A", "D", "G", "L"),
             C = c("Best", "List", "Dataframe", "Rstats"))Code language: R (r)
We can also display our list (and the vectors) like this:
DataCode language: R (r)In the two code chunks above, we used the list() function together with two functions, first to create the list called Data. Here, we used c and seq in R to generate vectors. Additionally, we named the different vectors in the list A, B, and C. Finally; we printed the list using the list’s name (i.e., Data). Here is the generated list:
In the next section, you will learn how to convert the list to a dataframe.
Example 1: Convert List to Dataframe in R
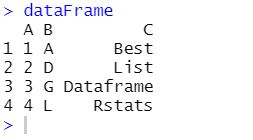
In the first example, we will use R’s as.data.frame() function to convert the list to a dataframe:
dataFrame <- as.data.frame(Data)
dataFrameCode language: R (r)
In the code chunk above, we used the function mentioned above using the list as the first argument. Here is the dataframe that we generated from our list:
If your data is stored in a matrix, for example, it is possible to convert a matrix to a dataframe in R. In the next example, we are going to set the column names while converting the list to a dataframe.
Example 2: Convert a List to Dataframe in R and Change the Column Names
Here is how we add the col.names parameter to change the column names:
dataFrame <- as.data.frame(Data,
                           col.names = c("Numbers", "Letters", "Words"))
dataFrameCode language: R (r)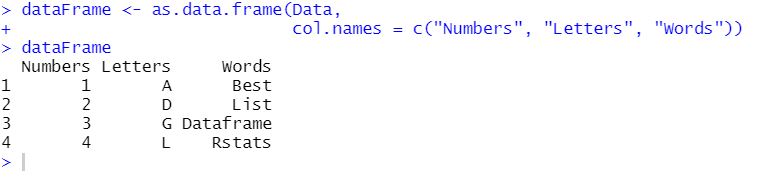
Noteworthy, it is also possible to name the rows using the row.names argument. However, if you have a lot of observations/data points, this might not be feasible. In the next example, we will look at how we can use the do.call function to accomplish the same but make the rows columns as well. In a recent post, you can learn how to create a matrix in R.
Example 3: Converting a List to Dataframe in R using the do.call Function
In this example, you will learn how to use the as.data.frame function, the cbind, and the do.call functions to convert a list to a dataframe in R. Here is a code snippet:
as.data.frame(do.call(cbind, Data))Code language: R (r)As you can see, in the code chunk above, we used the do.call function as an argument in the cas.data.frame function. Moreover, we used the cbind function and, finally, the list we wanted to convert as the last argument. This will create a dataframe similar to the earlier ones. Now, you may wonder why we would like to do something like this. Well, we can use the rbind function instead of the cbind function. This will give us the following result:
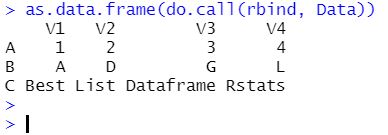
As you can see, we got the rows as columns. If you need to change the column names, you can have a look at the post: How to Rename Column (or Columns) in R with dplyr
In the next and final example, we will use dplyr to convert a list to a dataframe in R.
Example 4: Convert List to Dataframe in R using dplyr
Here is how we can convert a list to dataframe in R using dplyr:
library(dplyr)
dataFrame <- Data %>%
  as_tibble()
dataFrameCode language: R (r)
In the code chunk above, there are some new things introduced. First, we used the piping operator (%>%). Following this operator, we used the as_tibble function. This code chunk will create a dataframe called dataFrame by taking the list (Data) and putting it as an argument to the as_tibble function. We need to have the input/argument (i.e., the data in the list) left to the piping operator.

See the recent posts about how to remove a row in R and how to create violin plots
To turn a list of vectors into a dataframe in R, you can use the data.frame() function. Each vector in the list will become a column in the dataframe. Here is how to do it: my_dataframe <- data.frame(my_list).
To turn a list into a dataframe in R, you can use the do.call() function along with data.frame(). Here is how you can do it: my_dataframe <- do.call(data.frame, my_list).
Conclusion
This post taught you how to convert a list to dataframe in R. More specifically, you learned how to do this by four examples. First, we started out using the as.data.frame function on an example list. Second, we changed the column names using one of the arguments of the as.data.frame function when we converted the list. Third, we also looked at how we can use the do.call function. In the final example, we used the dplyr package from the popular Tidyverse package. To conclude, the easiest way to convert a list to a dataframe in R is to use the as.data.frame function or the as_tibble function from dplyr. I hope you learned something valuable. If you did, please comment below and share the posts on your social media accounts. Finally, if you want something covered on the blog, comment below or use the contact information.