In this post, we will learn how to remove a specific row in R using both base functions and the dplyr package. Previously, we learned how to remove a row from a dataframe with conditions and delete duplicated rows using dplyr. In this post, we will extend our data manipulation skills by learning various methods to remove specific rows in R. Let us begin!
Table of Contents
- Outline
- Prerequisites
- Base R Examples of Removing a Specific Row in R
- Examples of using dplyr to remove specific row in R
- Base R vs. dplyr
- Summary
Outline
The post is structured as follows. First, we look at Base R examples showing us how to remove a specific row. Then, we learn techniques such as removing a row by index and excluding rows with NA values in particular columns. Following this, we will do the same using the dplyr package; that is, look at how we can, e.g., remove specific rows in R. With the slice() function, we will learn how to delete a specific row by index. Subsequently, we will learn how to use dplyr to remove rows based on NA values, both in a specific column and across any column.
Prerequisites
Prerequisites for this post include a basic understanding of R scripting, which provides for writing and saving scripts. You also need to know how to load data into R, but worry not if you are new to certain coding concepts; each code chunk will be thoroughly explained. A grasp of R’s syntax and basic data manipulation concepts is also needed, as it makes the post easier to follow.
Base R Examples of Removing a Specific Row in R
Here are three examples using base functions to remove a row in R:
1. Remove a Row by Index
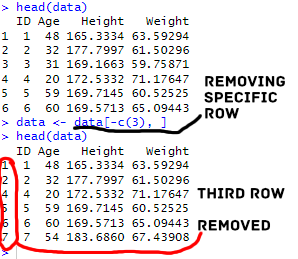
Here is how we remove the third row in a dataframe:
# Example 1: Remove row by index
data <- data[-c(3), ]Code language: R (r)
In the code chunk above, we used base R to remove a specific row using index-based referencing. Specifically, we used the square brackets [] for subsetting in R, and the c() function to create a vector containing the row index we wanted to remove. In this case, we removed the third row from the data dataframe. It is important to note that the comma after the index ensures that we are also specifying the columns (in this case, we are selecting all columns).
2. Remove Row if NA in Specific Column
Here is how to use base R to remove a row if NA in a specific column:
# Example 2: Remove row if NA in the 'Age' column
data <- data[!is.na(data$Age), ]
Code language: R (r)
In this code chunk, we used base R to delete rows with missing values in the ‘Age’ column. Building upon the first example, we continued using square brackets [] for subsetting. The ! symbol signifies the logical NOT operator, and is.na(data$Age) creates a logical vector, identifying rows where the ‘Age’ column has missing values.
Remove Row if NA in Any Column
Here is how we remove a row if we have missing values (NA) in any column:
# Example 3: Remove row if NA in any column
data <- data[complete.cases(data), ]Code language: CSS (css)
In this example, we extended our base R approach to remove rows containing missing values in any column. Here, we used the function complete.cases(data) which generates a logical vector. This vector contains rows without any missing values across all columns. By applying this vector within square brackets [], we selected only those rows with complete cases, eliminating rows with NA in any column. We can also remove a row with missing values in all important columns:

Examples of using dplyr to remove specific row in R
We can use dplyr for the same task as above:
1. Remove Specific Row with the slice() function
Here is how we can remove specific row in R with dplyr’s slice() function:
# Example 4: Remove row by index using dplyr
data <- data %>%
  slice(-3)Code language: R (r)
In the code snippet above, we used the %>% (pipe) operator to perform operations on the dataframe using the dplyr package. Importantly, with slice(-3), we used the index of the column we wanted to remove (I.e., the third).. The %>% operator allows us to chain operations, making it clear that we are modifying the dataframe in a sequential manner.
2. Remove Row if NA in Specific Column
Here is how we can remove rows with missing values in a specific column using dplyr:
# Example 5: Remove row if NA in the 'Age' column using dplyr
data <- data %>%
  filter(!is.na(Age))Code language: R (r)
In the snippet above, we used the filter() function to keep rows where the ‘Age’ column is not missing (!is.na(Age)).
3. Remove Row if NA in Any Column
Here is how to use R to remove a row if NA is in any of the columns:
# Example 6: Remove row if NA in any column using dplyr
data <- data %>%
  drop_na()Code language: R (r)
In the code snippet above, we used drop_na() from the dplyr. This function removes rows containing any missing values in the dataset. It offers a cleaner alternative to the base R approach (i.e., in example 3).
Base R vs. dplyr
There are trade-offs when considering whether to use dplyr or base R for data manipulation. Base R offers self-sufficiency; we do not rely on external packages, making it suitable for environments with installation restrictions. Here, we do not rely on the maintenance of external packages such as dplyr as well. However, this independence comes with limitations. Base R might require more code and lack the streamlined functionality of dplyr, which is part of the Tidyverse.
dplyr, on the other hand, offers an intuitive syntax, promoting readable and concise code. It integrates with other Tidyverse packages, providing additional tools for tasks like selecting columns, removing variables in R, and calculating observations in R. While depending on external packages may pose maintenance concerns, the enhanced readability and efficiency of dplyr make it a compelling choice, especially in data analysis workflows where clarity and reproducibility are important.
Summary
In this guide, we learned different methods to remove specific row in R using both base functions and the dplyr package. Starting with base R, we covered different examples such as removing rows by index, eliminating those with missing values in specific columns, and filtering out rows with any missing values. Moving over to the dplyr package, we used it for the same tasks. Here, we learned to use functions like slice(), filter(), and drop_na(), making our code more intuitive and concise. Whether you prefer the simplicity of base R or the elegance of the tidyverse, this post equips you with versatile techniques to address various data-cleaning challenges.
Your feedback is invaluable! Please share this post on social media to help others, and do not hesitate to comment with corrections, suggestions, or requests for future topics. Engaging with the community enhances the learning experience for everyone!