In this guest post, you will learn by example how to do two popular machine learning techniques called random forest and extremely random forests. In fact, this post is an excerpt (adapted to the blog format) from the forthcoming Artificial Intelligence with Python – Second Edition: Your Complete Guide to Building Intelligent Apps using Python 3.x and TensorFlow 2. Now, before you will learn how to carry out random forests in Python with scikit-learn, you will find some brief information about the book.
Table of Contents
- Artificial Intelligence with Python – Second Edition
- What are Random Forests and Extremely Random Forests?
- Building Random Forest and Extremely Random Forest Classifiers
- Summary: Random Forests in Python
- Authors Biography
Artificial Intelligence with Python – Second Edition
The new edition of this book, which will guide you to artificial intelligence with Python, is now updated to Python 3.x and TensorFlow 2. Furthermore, it has new chapters that, besides random forests, cover recurrent neural networks, artificial intelligence and Big Data, fundamental use cases, chatbots, and more. Finally, artificial Intelligence with Python – Second Edition is written by two experts in the field of artificial intelligence; Alberto Artasanches and Pratek Joshi (more information about the authors can be found towards the end of the post).
Now, in the next section of this post, you will learn what random forests and extremely random forests are. After that, there’s a code example on how to set up a script to do these types of classification with Python and scikit-learn learn.
What are Random Forests and Extremely Random Forests?
A random forest is an instance of ensemble learning where individual models are constructed using decision trees. This ensemble of decision trees is then used to predict the output value. We use a random subset of training data to construct each decision tree. This will ensure diversity among various decision trees. In the first section, we discussed that one of the most important attributes when building good ensemble learning models is that we ensure that there is diversity among individual models.
Advantages of Random Forests
One of the advantages of random forests is that they do not overfit. Overfitting is a frequent problem in machine learning. Overfitting is more likely with nonparametric and nonlinear models that have more flexibility when learning a target function. By constructing a diverse set of decision trees using various random subsets, we ensure that the model does not overfit the training data. During the construction of the tree, the nodes are split successively, and the best thresholds are chosen to reduce the entropy at each level. This split doesn’t consider all the features in the input dataset. Instead, it chooses the best split among the random subset of the features that are under consideration. Adding this randomness tends to increase the bias of the random forest, but the variance decreases because of averaging. Hence, we end up with a robust model.
Extremely Random Forests
Extremely random forests take randomness to the next level. Along with taking a random subset of features, the thresholds are chosen randomly as well. These randomly generated thresholds are chosen as the splitting rules, which reduce the variance of the model even further. Hence, the decision boundaries obtained using extremely random forests tend to be smoother than the ones obtained using random forests. Some implementations of extremely random forest algorithms also enable better parallelization and can scale better.
Building Random Forest and Extremely Random Forest Classifiers
Let’s see how we can build a classifier based on random forests and extremely random forests. The way to construct both classifiers is very similar, so an input flag is used to specify which classifier needs to be built.
Create a new Python file and import the following packages:
import argparse

import numpy as np

import matplotlib.pyplot as plt

from sklearn.metrics import classification_report

from sklearn.ensemble import RandomForestClassifier, ExtraTreesClassifier

from sklearn.model_selection import train_test_split

from sklearn.metrics import classification_report


from utilities import visualize_classifierCode language: Python (python)
If you need to, you can convert an array to integer Python. That is, if you are working with data in NumPy arrays, for example.
Constructing a Random Forest Classifier in Python
Define an argument parser for Python so that we can take the classifier type as an input parameter. Depending on this parameter, we can construct a random forest classifier or an extremely random forest classifier:
# Argument parser

def build_arg_parser():

    parser = argparse.ArgumentParser(description='Classify data using \

            Ensemble Learning techniques')

    parser.add_argument('--classifier-type', dest='classifier_type',

            required=True, choices=['rf', 'erf'], help="Type of classifier \

                    to use; can be either 'rf' or 'erf'")

    return parserCode language: Python (python)
Define the main function and parse the input arguments:
if __name__=='__main__':

    # Parse the input arguments

    args = build_arg_parser().parse_args()

    classifier_type = args.classifier_typeCode language: Python (python)
In this random forest in Python example, data is loaded from the data_random_forests.txt file. Each line in this file contains comma-separated values. The first two values correspond to the input data and the last value corresponds to the target label. We have three distinct classes in this dataset. Let’s load the data from that file:
    # Load input data

    input_file = 'data_random_forests.txt'

    data = np.loadtxt(input_file, delimiter=',')

    X, y = data[:, :-1], data[:, -1]Code language: Python (python)
A side note, on this blog there are many guides, and tutorials, on how to import data with Python. In some cases, the data may be stored in CSV or Excel files. Here are two posts by the author of this blog if you need to import data from other formats:
Separate the input data into three classes:
    # Separate input data into three classes based on labels

    class_0 = np.array(X[y==0])

    class_1 = np.array(X[y==1])

    class_2 = np.array(X[y==2])Code language: Python (python)
Let’s visualize the input data:
    # Visualize input data

    plt.figure()

    plt.scatter(class_0[:, 0], class_0[:, 1], s=75, facecolors='white',

                    edgecolors='black', linewidth=1, marker='s')

    plt.scatter(class_1[:, 0], class_1[:, 1], s=75, facecolors='white',

                    edgecolors='black', linewidth=1, marker='o')

    plt.scatter(class_2[:, 0], class_2[:, 1], s=75, facecolors='white',

                    edgecolors='black', linewidth=1, marker='^')

    plt.title('Input data')Code language: Python (python)
Split the data into training and testing datasets:
    # Split data into training and testing datasets

    X_train, X_test, y_train, y_test = train_test_split(

            X, y, test_size=0.25, random_state=5)Code language: Python (python)
Define the parameters to be used when we construct the classifier. The n_estimators parameter refers to the number of trees that will be constructed. The max_depth parameter refers to the maximum number of levels in each tree. The random_state parameter refers to the seed value of the random number generator needed to initialize the random forest classifier algorithm:
    # Ensemble Learning classifier

    params = {'n_estimators': 100, 'max_depth': 4, 'random_state': 0}Code language: Python (python)
Depending on the input parameter, we either construct a random forest classifier or an extremely random forest classifier:
    if classifier_type == 'rf':

        classifier = RandomForestClassifier(**params)

    else:

        classifier = ExtraTreesClassifier(**params)Code language: Python (python)
Visualize a Random Forest Classifier in Python
Train and visualize the classifier:
    classifier.fit(X_train, y_train)

    visualize_classifier(classifier, X_train, y_train, 'Training dataset')Code language: Python (python)
Compute the output based on the test dataset and visualize it:
    y_test_pred = classifier.predict(X_test)

    visualize_classifier(classifier, X_test, y_test, 'Test dataset')Code language: Python (python)
Evaluate the performance of the classifier by printing the classification report:
    # Evaluate classifier performance

    class_names = ['Class-0', 'Class-1', 'Class-2']

    print("\n" + "#"*40)

    print("\nClassifier performance on training dataset\n")

    print(classification_report(y_train, classifier.predict(X_train), target_names=class_names))

    print("#"*40 + "\n")


    print("#"*40)

    print("\nClassifier performance on test dataset\n")

    print(classification_report(y_test, y_test_pred, target_names=class_names))

    print("#"*40 + "\n")Code language: Python (python)
Running a Random Forest Classifier in Python
If you were to save the code in the file random_forests.py file. Let’s run the code with the random forest classifier using the rf flag in the input argument. Run the following command:
$ python3 random_forests.py --classifier-type rf
You will see a few figures pop up. The first screenshot is the input data:
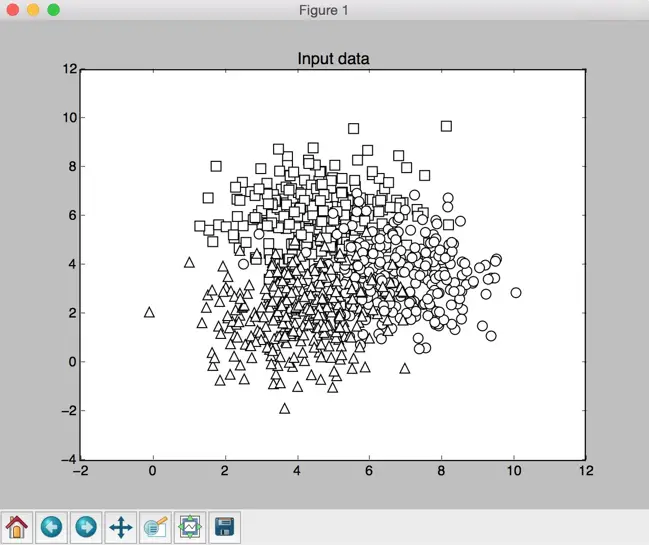
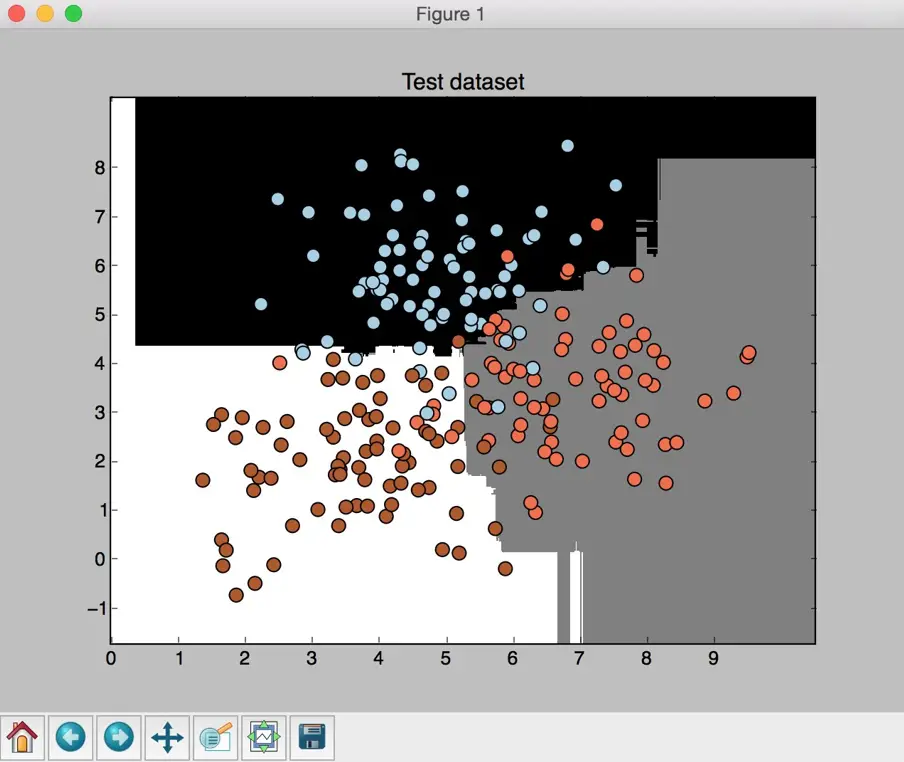
In the preceding screenshot, the three classes are being represented by squares, circles, and triangles. We see that there is a lot of overlap between classes, but that should be fine for now. The second screenshot shows the classifier boundaries:
Extremely Random Forest in Python
Now let’s run the code with the extremely random forest classifier by using the erf flag in the input argument. Run the following command:
$ python3 random_forests.py --classifier-type erf Code language: Bash (bash)You will see a few figures pop up. We already know what the input data looks like. The second screenshot shows the classifier boundaries:
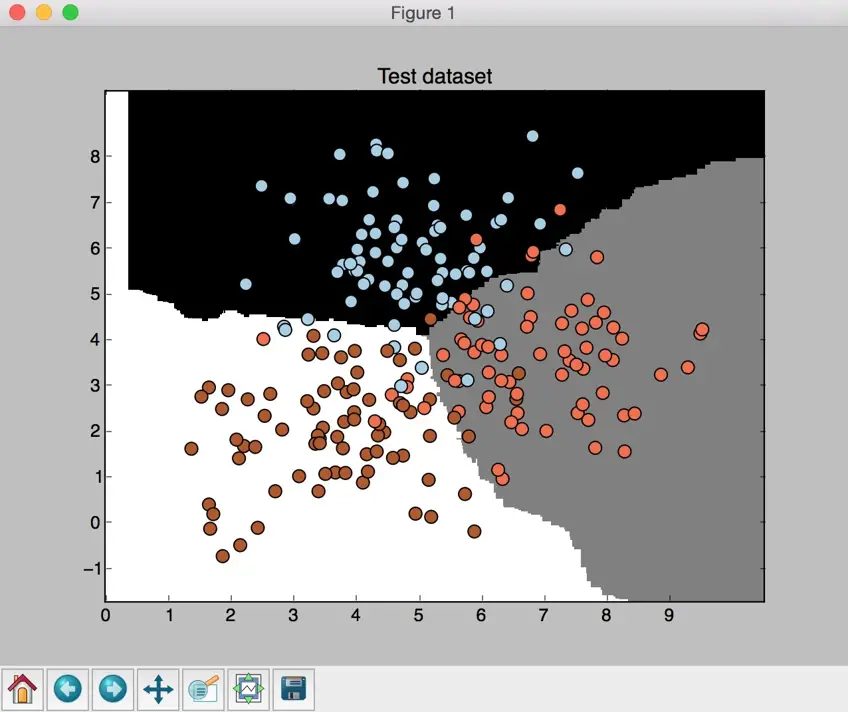
If you compare the preceding screenshot with the boundaries obtained from the random forest classifier, you will see that these boundaries are smoother. The reason is that extremely random forests have more freedom during the training process to come up with good decision trees, hence they usually produce better boundaries.
Summary: Random Forests in Python
Now, to summarize, in this post, you have learned about the forthcoming new edition of the book Artificial Intelligence with Python. To fully get all you can from this book you need basic Python programming experience and awareness of machine learning concepts and techniques.
However, the most important part of this blog post, and maybe the take-home message, was to learn how to do random forests in Python using scikit-learn.
Authors Biography
Alberto Artasanchez is a data scientist with over 25 years of consulting experience with Fortune 500 companies as well as startups. He has an extensive background in artificial intelligence and advanced algorithms. Mr. Artasanchez holds 8 AWS certifications including the Big Data Specialty and the Machine Learning Specialty certifications. He is an AWS Ambassador and publishes frequently in a variety of data science blogs. He is often tapped as a speaker on topics ranging from Data Science, Big Data and Analytics, underwriting optimization and fraud detection. Alberto has a strong and extensive track record of designing and building end-to-end machine learning platforms at scale. He graduated with a Master of Science degree from Wayne State University and a Bachelor of Arts degree from Kalamazoo College. Alberto is particularly interested in using Artificial Intelligence to build Data Lakes at scale. Finally, he is married to his lovely wife Karen and is addicted to CrossFit.
Prateek Joshi is the founder of Plutoshift and a published author of 9 books on Artificial Intelligence. He has been featured on Forbes 30 Under 30, NBC, Bloomberg, CNBC, TechCrunch, and The Business Journals. He has been an invited speaker at conferences such as TEDx, Global Big Data Conference, Machine Learning Developers Conference, and Silicon Valley Deep Learning. His tech blog (www.prateekjoshi.com) has received more than 2M+ page views from 200+ countries and has 7,500+ followers. Apart from Artificial Intelligence, some of the topics that excite him are number theory, cryptography, and quantum computing. His greater goal is to make Artificial Intelligence accessible to everyone so that it can impact billions of people around the world.